|
Why does your tool have a different result than a blocklist provider's site?
Copy Link
This is not a bug, but merely a result of DNS propagation. Our tool queries the blocklist provider's DNS servers and returns the results. Sometimes a list will update DNS before or after their Web interface, which can provide different results.
Our tool acts in the same manner that a receiving mail server would, so if you see results on our tool, your mail delivery might be being impacted.
|
|
Which IP Addresses do your monitoring servers use?
Copy Link
In order to minimize false positives due to connection problems by our monitoring services, we ask that you please whitelist these IP ranges on your firewall or network security systems:
- 44.194.168.193
- 52.55.244.91
- 18.205.72.90
- 18.209.86.113
|
|
How do I get off Backscatterer?
Copy Link
Backscatterer lists based on Misdirected Bounces or Misdirected Autoresponders or Sender Callouts. They do not offer delistings and will only remove you after they do not see this traffic for 30 days.
Keep in mind that this list is a "best practices" list and very few people block email based off this list. Many large mail systems, such as Windows Live Mail, Gmail, Yahoo, etc., end up on this list. If you are having delivery issues, there might be something else that needs to be addressed.
In short, they want you to not send bouncebacks for non-existent email accounts. Any vacation auto-responders or auto-replies should not send more than once in a 24-hour period, and your system should not use the VRFY command to check if an address is valid (few systems do by default anymore).
You can opt out of being alerted to a status change by going to your notification policy. You can find your notification policy by clicking on "Monitor", then "Notifications", then the appropriate policy (usually default).
You will find the "Filters" section at the bottom. You can choose to opt out of receiving alerts about any specific status change you wish by using the drop-down box.
|
|
Why does your website say I am "greylisted"?
Copy Link
Our anti-abuse system has banned your IP address for too many lookups. Please make sure that you are not using an automated system to perform lookups on our tools. If you are running an automated system to perform lookups, we suggest using our API.
More information about our API can be found here.
|
|
How do I add additional users to my account?
Copy Link
Click on your email address in the top right corner and click on "Settings".

Once you are in Settings, do the following:
- Click on Account.
- Input the email address you would like to add.
- Choose if you want the new user to have User or Editor rights.
- Click on Add User.

The user will receive an invitation and will need to fill out their account settings and create a password.
|
|
I need help finding my emailed invoices.
Copy Link
All invoices are emailed with the subject "MxToolBox Invoice#" to the email address on file when we process the credit card on file. Please check your Spam/Junk Folder and ensure that our email address is on your Whitelist/Approved Senders.
|
|
How do I view previous invoices?
Copy Link
You can access past invoices from the Billing tab.

Or, you can click on your email address in the top right corner, then click on Billing.

- Under the Invoices section, click on View to see your previous invoices.

- If needed, click on Update Card to update your credit card information.

|
|
Why am I receiving down alerts for Mailflow?
Copy Link
If you are receiving alerts for your Mailflow monitor and you are still able to send and receive email, chances are we did not receive a test message back to our system.
Click on the monitor and let it populate in the right window of the page. Under the graph you will see Outages | History | Pings | Edit > Click on Pings.

There are two (2) different results under the Pings table.
- A message with a Green Check is a successful message returned to us. You can click on the details link and it will provide you the full headers and more information about the test message.
- A message with a Red X on it is a failed message. If you click on Error, this will show you the test message's subject.
If the message is failing:
- Use the message subject to check that it is not being filtering by an inbound appliance or spam software.
- Use the message subject to check your outbound SMTP logs to see if the message is leaving your gateway.
|
|
DMARC - How do I remove a domain from MxDelivery Center?
Copy Link
To remove a domain that you did not activate in the MxDelivery Center, follow these simple steps:
- Log in to your account.
- Click the MxDelivery Center link at the top of the screen, or on the specific monitor for the domain that you would like to remove (Delivery Report).
- Click the Gear icon in the upper right of the screen.

- Click Domain Setup.
- Click "Remove" next to the domain.

**You should make sure that the domain that you want to remove is actually the domain next to the "Remove" option.
|
|
How can I inform you of a bug with the tools?
Copy Link
Please click the “Report a bug” link to open a ticket. Please include a description of what you have seen and any Steps to Reproduce, if you can supply them. If the error occurs on a specific URL, please include that, as well.
We appreciate your feedback!
|
|
Why am I getting DMARC DNS alerts when I do not have a DMARC monitor?
Copy Link
All MxDelivery Center customers are automatically subscribed to a DMARC DNS record monitor.
|
|
Where can I find more information about an alert or error?
Copy Link
You can find details about different warnings from our tools on the SMTP Problem Details page.
|
|
Where can I find more information about a blocklist error?
Copy Link
You can see details about different errors from our tools on the Blacklist Problem Details page.
|
|
Where can I find more information about an alert or error?
Copy Link
You can see details about different warnings and errors from our tools on the Problem Details page.
|
|
How can I make changes to the CIDR blocks that are being monitored for my account?
Copy Link
Please describe the changes you need below and we will be in contact shortly.
|
|
How do I update my credit card?
Copy Link
You can update your credit card information by clicking 'Billing Information Manager' on the Billing Page.
|
|
How do I cancel my account?
Copy Link
MxToolbox is sorry to see you go! We hope you had a good experience with us and that you find use for our tools in the future.
If you are a current customer and want to cancel services, simply follow these instructions to delete your MxToolbox account:
- Log in to your account.
- Click “username@mxtoolbx.com” in top right corner for dropdown menu.
- Click “Billing” option directly below username.
- Click “Cancel Services” hyperlink above Billing Email field.
- Click “OK” to confirm you want to cancel your account.
After the cancelation request is complete, your account will remain active until the end of your paid billing period. It will cancel prior to the next renewal date. If you are an annual customer, your account will remain active until the end of your annual billing period.
If we can improve anything to change your mind, please let us know. Thank you for being an MxToolbox customer!
|
|
How do I update my billing information?
Copy Link
You can update your credit card information by accessing your Billing Details Page.
Simply log in to your MxToolbox account, go to the following link, and click "Update Card":
https://mxtoolbox.com/user/billing.aspx
|
|
How do I delete a monitor from the dashboard?
Copy Link
To delete a monitor from the dashboard, follow these steps:
-Click on the card of the monitor you want to remove.
-Once the information populates on the right-hand side of the dashboard, do the following:
1. Click on Edit

2. Click on Delete Monitor

3. Click on Confirm Delete

|
|
How do I add tools to My Favorite Tools?
Copy Link
To add lookup tools to the My Favorite Tools tab, please follow these steps:
1. Log in to your MxToolbox account.
2. Click the All Tools header.
3. By default, the My Favorite Tools section appears.
4. Click any of the All Tools, Email, Network, Website, DNS, or New tabs.
5. Click the heart icon next to a tool’s title.
6. The selected tool is now saved on your My Favorite Tools tab.
7. To remove a tool from that tab, simply unclick the tool’s heart icon.
|
|
How do I request Support for my Managed Services account?
Copy Link
You are in the correct place! Please describe the type of assistance you would like and a Support technician will contact you soon. Thank you!
|
|
I have reached my limit of users. How can I get more?
Copy Link
Please open a Support ticket with us. We will review your request, add the users, and get back to you quickly. You can find the "Submit Ticket" button on the Support page.
Have a great day!
|
|
How do I get MxToolbox's W-9?
Copy Link
Download it now, right here! (W-9 forms do not expire). Or, you can copy the following URL and paste it into your browser: https://mxtoolbox.com/public/documents/MxToolBox_W9.pdf
|
|
How do I get a sales tax exemption applied to my account?
Copy Link
To request a sales tax exemption, please open a Support Ticket by clicking the blue "Submit a Ticket" button. When submitting the ticket, be sure to select "Billing Inquiry" as the type. Once we have received your request, we will give you an email address of where to send your Sales Tax Exemption form.
|
|
How do I change my billing cycle from Monthly to Annual, or vice versa?
Copy Link
If you would like to change your billing cycle from monthly to annual, please open a Support Ticket by clicking the blue "Submit a Ticket" button at the top right of this page. When submitting the ticket, be sure to select "Billing Inquiry" as the type.
|
|
Why is there an "Adjustment for services added" during the last billing period?
Copy Link
Depending on the type of plan you have, in some cases, you might see a line item for "Adjustment for services added...". This is because we bill in advance for services for the upcoming billing period (e.g., month, quarter) and in arrears for services added during the previous period (e.g., month, quarter). This adjustment is the difference between what you paid the previous month/quarter and the services actually used.
This will only occur if you added new monitors to your account since your last billing period.
|
|
Delivery Center Customers: How do I change the billing email address for the account?
Copy Link
Delivery Center Customers
Please follow the below steps to change the billing address associated with your MxToolbox account. If you have any billing address questions, please contact Support by opening a ticket on this page.
- Log in to your account.
- Click the Delivery Center tab at the top of the page.
- Click the Notifications option on the left navigation bar.
- Click the “Notifications by Type” tab/category in the white headers section.
- Select the "Account" tab/category in the gray headers section.
- Click “Billing Reminders” to see the Assigned Users list on the right side of the page.
- Select which user's email address you want to receive billing notices by clicking the associated button.
- To expand your organization's list of users, click the blue "Invite New User" button at the bottom of the column and follow the steps.
- Once you finalize your selections, click the green "Save" button in the upper right of the page to complete your updates.
Your changes have now been saved and billing notices will be sent to the new address.
|
|
How do I access API documentation?
Copy Link
The MxToolbox API is a RESTful Web Service allowing MxToolbox customers to query the status of their monitors and run lookups (e.g., blocklist, smtp, mx, etc.). Generally, programmers use this API to integrate MxToolbox into their products. For example, customers have created a dashboard on their site which shows the real-time status of their monitors.
To view the API documentation associated with your MxToolbox account, simply follow the below steps:
- Log in to your account.
- Click “username@mxtoolbx.com” in top right corner for dropdown menu.
- Click “Settings” option directly below username.
- Click “API” tab in main header section (seventh tab available).
- Use the available API methods listed (e.g., Lookup, Monitor, Monitor Tags, Usage) as needed.
If you have any questions about API, please contact the MxToolbox Support Team.
|
|
How do I get my IP/domain removed from a blocklist?
Copy Link
Blocklists affect your email reputation and can impair the delivery of your messages. While there are many additional factors in email delivery, knowing if your IPs/domains are blocklisted is a critical aspect of email delivery.
Blocklists are private entities that can add or remove IPs/domains as they see fit. It can often be frustrating when trying to request removal, especially when the lists simply do not respond. Be aware that when requesting removal, you need to follow all of the instructions on the specific blocklist’s site and that you explain what actions you have taken to ensure your system is safe and secure. We recommend that you address the following aspects of your request for removal:
- Ensure you have included all of the information requested. If there is a form to fill out, make sure the information is thorough and accurate. If an email or general input box is used, be sure to read through any text on the page. Often, lists will request something specific and if it is not included, your request will be ignored.
- You must explain the actions you have taken to check your system. This should include actions such as virus scans, reviewing email logs, and using the Mxtoolbox SMTP Tool to check for an open relay. The more information you include about what you did to resolve the problem or check to ensure that your system is not compromised, the more likely your request will be successful.
- Be nice. MxToolbox has worked with many of these lists, as well as users who have tried various tactics with the people running them, and we have found that rude, aggressive, or threatening messages never work. You are either messaging an automated system that will not care or, in some cases, a person who will likely disregard your request due to hostile language.
- Be proactive about improving your email reputation and message delivery. If you repeat the same habits that caused your domain to be blocklisted, you run the risk of being listed again. Implementing DMARC is a major step toward blocklist avoidance. MxToolbox's Delivery Center also helps you maintain a healthy domain, so check to see how it can improve your business email.
Although MxToolbox does NOT blocklist IPs/domains, we report on blocklistings. For tips on being delisted from specific blocklists, click here: Blocklist Knowledge Base.
Our subscribers have direct access to the MxToolbox Support team for any delisting concerns. And our convenient blocklist alerts provide links to the necessary removal steps. We have many years of experience with blocklists and are eager to help you.
|
|
Why is no DMARC data available in my Delivery Center?
Copy Link
There could be a brief delay after DMARC setup is complete, so your email data might not be instantly available. The most common reasons why no data is populating the dashboard once you properly set up an MxToolbox DMARC Record include:
- Incorrect Emailing Domain: This is fairly common. You added a domain and DMARC record, but you are sending from a different domain. | Solution: Confirm the domain that you are sending emails from. This is more common when you add a subdomain but send mail from the primary domain and vice versa.
- DNS Propagation: This is not very common, but it does happen sometimes. | Solution: Wait 24 to 72 hours after confirming that the proper record was added and not changed.
- After set up, you removed your DMARC record: Again, this is not very common, but it does occur. | Solution: Confirm that the proper DMARC record that MxToolbox requires is configured in the domain's DNS.
- You are sending to recipient systems that do not report DMARC data. | Solution: There is no resolution for this, only an explanation. (i.e., If you believe you are only sending to Office 365 users, be aware that although Microsoft filters and delivers emails based on DMARC, they do not send the aggregate data for DMARC back to senders.
In the meantime, be sure to set up other important aspects of your Delivery Center subscription, including Configuration, Protection, and Inbox Data.
|
|
Where can I find more information about an alert or error?
Copy Link
You can see details about different warnings and errors from our tools on the DNS Problem Details page.
|
|
I have an error for Primary Name Server Not Listed at Parent. What does that mean?
Copy Link
We recommend that you contact your Domain's Registrar to update the name servers on record to include the server that is not listed at the Root Servers.
------------------------------------
About DNS Primary Server Listed at Parent
Your Primary Name Server was not on the list of name servers given to us by the root.
If your name server is not listed at the root, it could cause impaired/incorrect lookups for your domain.
Additional Information
The Primary Name Server is the name server declared in your SOA file and is usually the name server that reads your records from zone files and is responsible for distributing that data to your secondary name servers. This problem is present when this primary name server is not included in the parent referrals and is almost always accompanied by a Local Parent Mismatch problem.
RFC 1035:
Here a primary name server acquires information about one or more zones by reading master files from its local file system, and answers queries about those zones that arrive from foreign resolvers. [RFC 1035]
DNS Propagation Check
If your Primary Name Server is not listed at your Parent or is not responding, then our DNS Propagation test tool will not operate properly. You will most likely also be experiencing other real-world problems with DNS queries for your domain. Users with Basic or Pro accounts can contact our Support Team for assistance with understanding any DNS warnings or errors with specific information about your domain. If you are still a free user, upgrading your account will give you access to support, as well as many other benefits.
Have a great day!
|
|
What does "DNS Change Alerts Due to TTL Changes" mean?
Copy Link
If you receive a DNS change alert from MxToolbox because of TTL changes, no need to panic. These incidents are typically caused by issues at your DNS hosting provider.
DNS TTL (time to live) is a setting that tells your DNS resolver how long to cache a query before requesting a new query. The gathered information is then stored in the cache of the recursive or local resolver for the TTL before it collects new, updated details.
For example, if your DNS TTL is set to 3,600 seconds (60 minutes), the DNS resolver will have to regather the details of a website (mxtoolbox.com) every hour. If 100 users visit our site during that time, they will all see the same visual until the resolvers update their TTL.
The TTL acts as a stopwatch for how long to keep a DNS record because it represents the time each step takes for DNS to cache a record. Recorded in seconds, using the best TTL time for your situation is key to your site's overall responsiveness.
MxToolbox often sees warning signs of issues and outages at DNS providers. Nearly every case is a problem with the specific DNS provider. For example, this outage occurred on May 5th, 2021, and affected customers' domain DNS servers: DNS outage.
To check the propagation of DNS records across your servers and see the selected TTLs, use our DNS Propagation Tool.
|
|
Why am I receiving down alerts for Mailflow?
Copy Link
If you are receiving alerts for your Mailflow monitor and you are still able to send and receive email, chances are we did not receive a test message back to our system.
Click on the monitor and let it populate in the right window of the page. Under the graph you will see Outages | History | Pings | Edit > Click on Pings.
There are two (2) different results under the Pings table.
- A message with a Green Check is a successful message returned to us. You can click on the details link and it will provide you the full headers and more information about the test message.
- A message with a Red X on it is a failed message. If you click on Error, this will show you the test message's subject.
If the message is failing:
- Use the message subject to check that it is not being filtering by an inbound appliance or spam software.
- Use the message subject to check your outbound SMTP logs to see if the message is leaving your gateway.
|
|
What does "Warning - Masked External Banner (Reverse DNS Failing)" mean?
Copy Link
When using the SMTP Diag tool, you see the banner you are displaying publicly is masked by asterisks:
Trying 1.2.3.4...
Connected to smtp.example.com.
220 *********************************************
The reverse check takes the banner and the PTR record for the IP address and sees if the domain is listed. Since all we get publicly is the asterisks, the comparison fails and you get the warning.
Many administrators choose to mask their banner in hopes that by not giving an attacker a domain name, they might avoid something like a directory harvest attack. If you are using a single IP address for inbound and outbound, then you need your domain in your PTR records for your outbound, so it should also be in your banner. However, this is personal preference, and nobody should deny sending or receiving mail from your server just because your banner does not contain your domain.
|
|
What does "Reverse DNS does not match your SMTP Banner" mean?
Copy Link
The reverse IP address name (PTR) is not contained in the server HELO or EHLO banner. In the example below, the string "someotherdomain.com" is not found anywhere in the server banner, which is reporting "example.com". This is only a warning, and in some cases you might not have control over it.
Example of incorrectly matching pair:
220 mx.example.com StrongMail SMTP Service at Wed, 09 Sep 2009 17:00:01 -0700
Not an Open Relay.
0 seconds – Good on Connection time
0.156 seconds – Good on Transaction time
OK – 1.2.3.4 resolves to mail.someotherdomain.com
Best practice would have 1.2.3.4 resolve to mx.example.com
Some mail servers look for this and use it to mark messages you send as questionable. Most mail systems will not reject your messages outright, but this might affect your spam score, increasing the likelihood that your messages will be marked as spam. We recommend that you contact your ISP and ask them to set up a reverse record (PTR) that matches the hostname of your mail server.
|
|
What does "Reverse DNS FAILED! This is a problem" mean?
Copy Link
When a sending server makes a connection to the recipient server, the recipient server notes the sending IP address and performs a reverse lookup. This is done by sending a DNS query, which returns a Fully Qualified Domain Name (FQDN) registered for that IP address. If the sending SMTP address matches the domain, then it is much more likely that the message is legitimate and, therefore, will be passed on to the recipient. If the IP address does not match, it is much more likely that the sending address was spoofed and, therefore, much more likely that it is unwanted and could be considered spam.
A Fully Qualified Domain Name (FQDN) is associated to an IP with a valid PTR record. You want the domain name portion of the FQDN to match the domain of your email address (e.g., If your sending addresses follow the convention of name@mydomain.com, your PTR record should contain something like mailserver.mydomain.com). Only the organization that controls and owns the IP can set a PTR record. PTR record queries are sent to the owner of the IP address, which is the ISP, unlike other DNS queries which are sent to the DNS server of whoever owns the domain. For this reason, setting a PTR record on your own DNS servers is essentially useless since no one is asking your servers.
To make any changes to your rDNS, you will need to contact your ISP. Or, if you host your own DNS (rare), you will adjust it yourself. You will not be able to do this in your DNS control panel unless your ISP also hosts your DNS and gives you the functionality to add your own rDNS records.
|
|
How do I tell MxToolbox about feedback or feature suggestions I have regarding the free SuperTools?
Copy Link
We welcome suggestions that can make our SuperTools better. You can submit your suggestions/feedback to us by filling out our feedback form here. We cannot always add your idea, but we love to get feedback! Thank you.
|
|
How do I set up DKIM for Office 365?
Copy Link
Microsoft has updated the process to set up DKIM for Office 365. Designed to prevent spoofing attacks, DKIM works in tandem with SPF to attain DMARC compliancy. DKIM lets a company add a digital signature to sent emails in the message header, which allows recipient providers to use the signature as a validation point to determine if incoming mail is legitimate.
To enable DKIM for your custom domain in Office 365, complete the steps outlined here: DKIM for Office 365.
|
|
How do I change the email address for the account?
Copy Link
The change email option is not functioning at this time. MxToolbox engineers are working to fix it. Until then, please click the "Submit a Ticket" button to request an email address change. Thank you for your patience.
To change the email address associated with your MxToolbox account, simply follow the below steps:
- Log in to your account.
- Click “username@mxtoolbx.com” in top right corner for dropdown menu.
- Click “Settings” option directly below username.
- Enter the new email address you want associated with your account.
- Click “Save Account Changes” to confirm update to email address.
- Your settings have been updated message will appear.
Note: Changing your email address requires you to re-log in to your account after completing the above steps.
|
|
Why do my headers fail DKIM when using the MxToolbox Header Analyzer?
Copy Link
There is a known problem with messages from Google GSuite/Gmail where the header gets altered when you copy the message, causing it to fail DKIM. Please use the guide below to get your message headers without the changes made by Google.
How to download the EML file from Google GSuite/Gmail:
1. Locate your message in the Google GSuite/Gmail inbox and click it.
2. Locate the three (3) vertical dots at the upper right.
3. Click the dots and choose “Show Original”.
4. Click the “Download Original” link.
5. Save the .eml file on your computer.
6. Open the .eml file with a text editor, such as Windows Notepad or TextEdit for Mac.
7. Copy all of the text in the file.
8. Paste the text into the Header Analyzer at https://mxtoolbox.com/EmailHeaders.aspx
|
|
Can I make bulk changes to my Monitors?
Copy Link
You can manage your monitors in bulk by creating commands to create or delete monitors. You can also organize your monitors by adding or removing tags.
Start by going to the Add Monitors area of monitoring.
Step 1. Click Bulk Add

Step 2. Select Advanced Mode
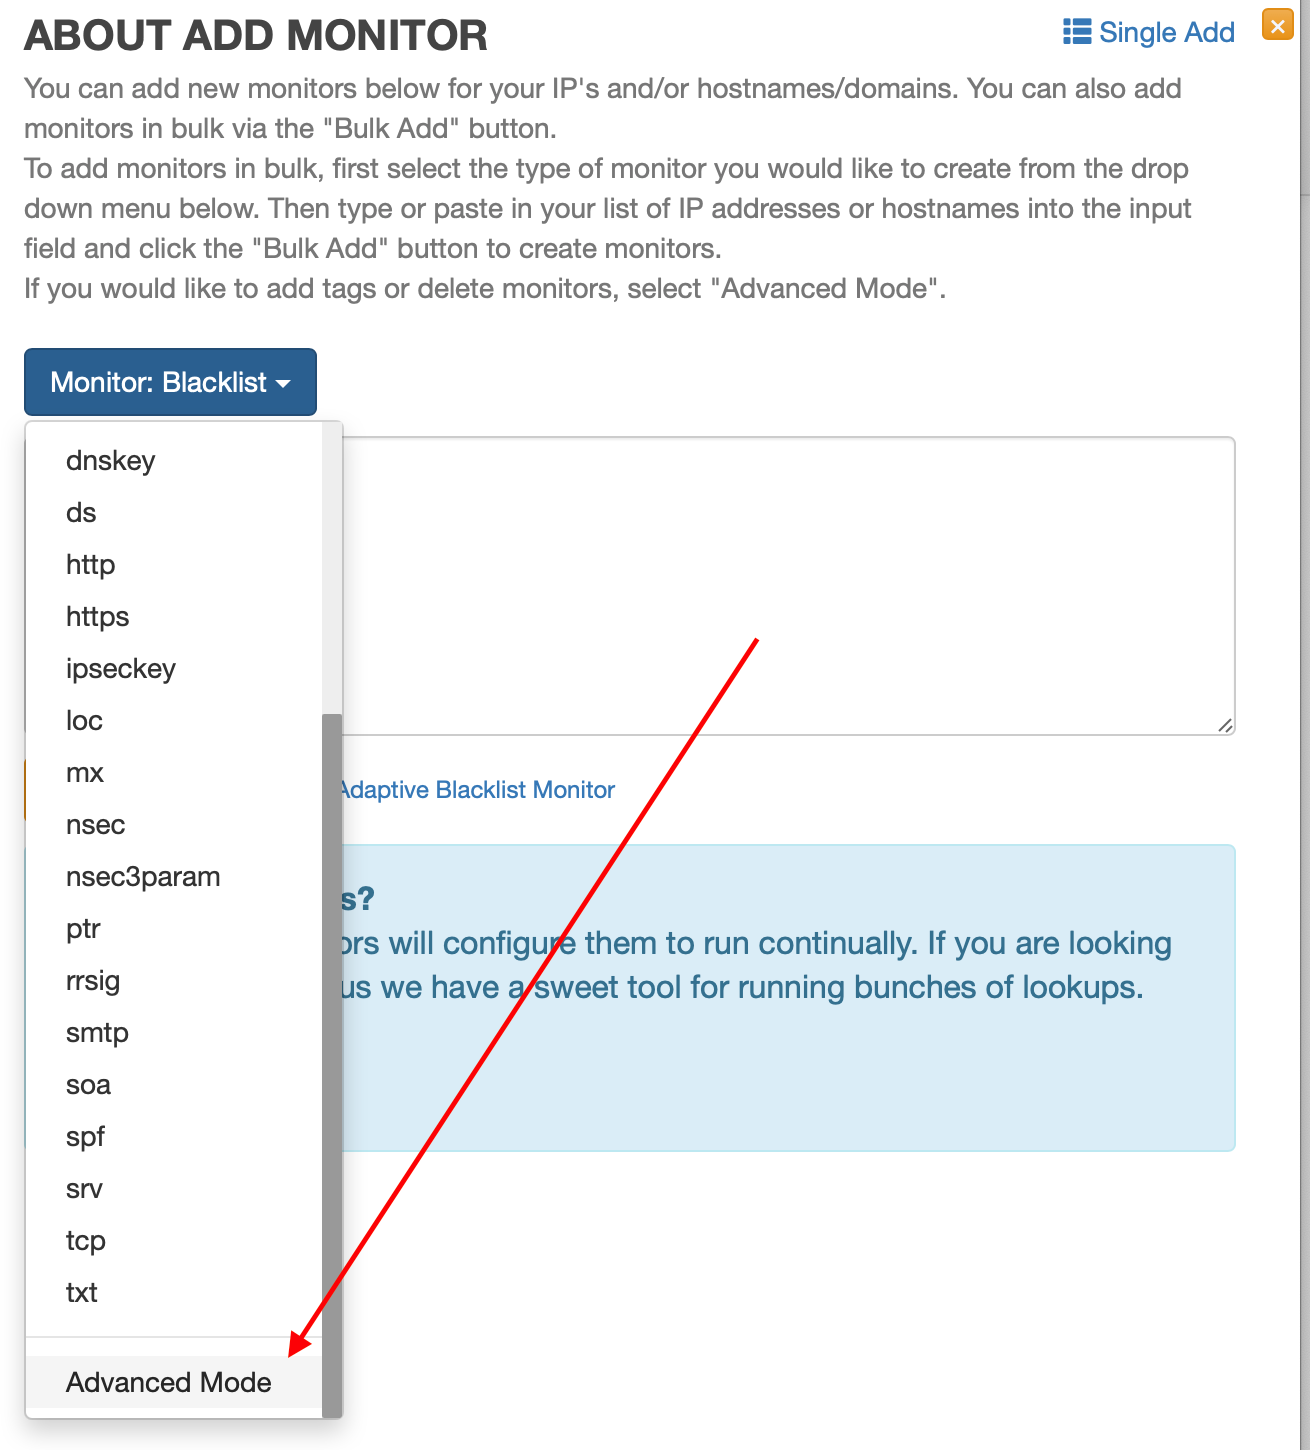
Step 3. Add your commands and then Click Execute Bulk Commands
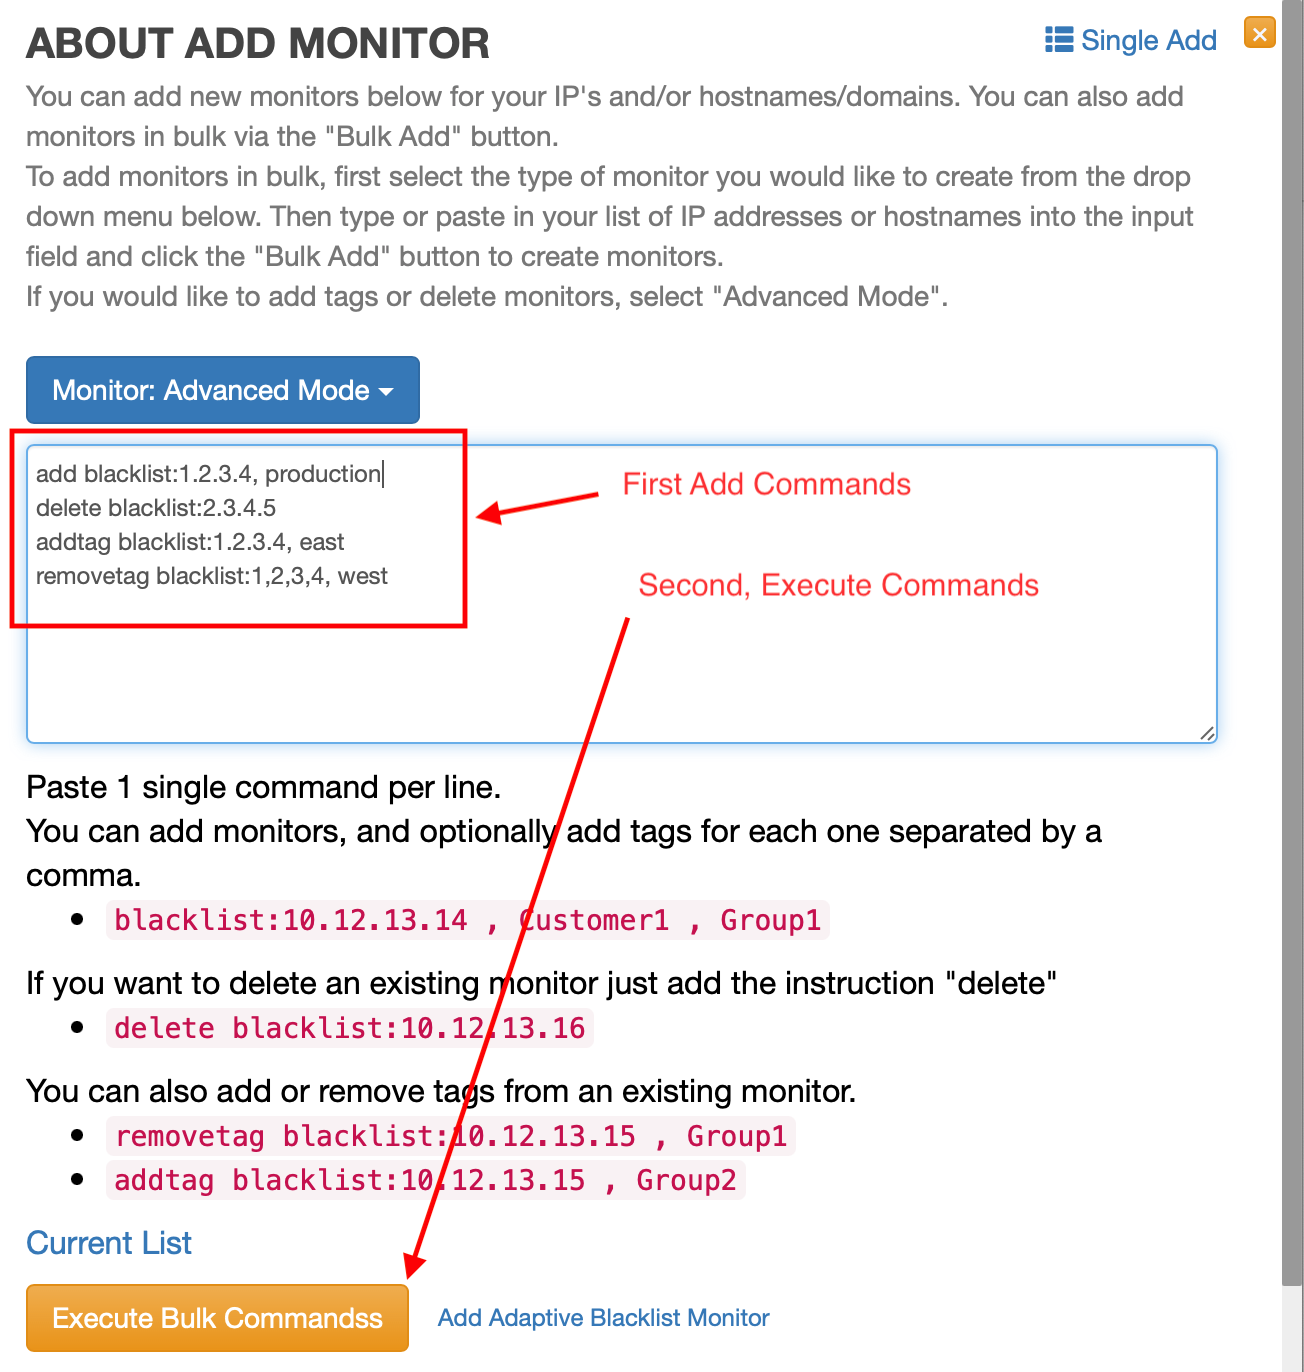
Once you submit commands to be run, it may take up to one minute for them to start being processed. Processing may take one or two seconds for each command.
If you would like assistance with generating commands or managing your monitors, please feel free to open a support ticket.
|
|
Is there a limit for the API?
Copy Link
Each paid plan has a daily limit for both simple and complex lookups. This limit applies to how many lookups you are allowed to request.
You can see your limits on the API Page or by running the API Usage call also found on that page.
In addition, we enforce rate limiting. This limit is variable. If you are getting 403 errors, you should add an exponential backoff to your code. See the AWS Article: Error retries and exponential backoff in AWS for information on building an exponential backoff.
If you upgrade your account, you do not need to revoke your API key. Contact the MxToolbox Sales Team to discuss increasing your daily limit or to ask any questions.
|
|
Can I delete data submitted to Email Header Analyzer tool?
Copy Link
Yes, when you are using the Email Header Analyzer tool at the bottom of the page is a link to "Permanently forget this email header".

Clicking this will delete that message from our system. If you have lost the link to your header, we cannot retrieve it. All headers are automatically deleted after 40 days.
|
|
How can I change my email address?
Copy Link
If you would like to change your email address, you must actually invite a new user to your account because your users are tied directly to email addresses.
However, this is very easy to do! Note: If your account is configured as a "View Only" account, you will need to ask a user listed as "Editor" or "Owner" to create the invitation.
- Visit the User Management settings page.
- Next to the "Invite User" option, type in the email address you would like to invite.
- Select the level of access you would like to give this new account. Users have Read-Only access to the account, while Editors can make changes.
- Click "Add User" to send the invitation.
- Once you accept the invitation and set your password on the new account, you can click "Remove" on the old account to clean it up.
Note: If you are an Owner, you will need to contact Support to transfer ownership to your new account.
|
|
What are the user permission levels in MxToolbox Delivery Center?
Copy Link
There are three permission level roles of access that MxToolbox users can be assigned:
- Owner: Full permissions to modify all account settings. The owner cannot be changed online. If you need to move account ownership to a different user, please contact Support by opening a ticket at the top of this page.
- Edit Access: Full permissions to modify all account settings. Can be removed by other editors or the current owner.
- Read-Only Access: Can read and view only. This permission type cannot make any changes to the account other than modifying their own information.
- Billing-Only: This will create the user as a Read-Only user as well as set their initial Notifications to only receive Billing Reminder notifications.
See current Notifications
Where do I set Permission Levels?
User permission levels are set when a new user is invited and can be updated on the Account Management page.
Which actions require Edit Access or higher?
The following is a list of common actions that require Edit Access:
- Adding/editing/deleting monitors
- Adding/removing Delivery Center domains
- Creating/updating notification alert policies
- Activating third-party integrations in Delivery Center
- Updating billing information
- Inviting new users
- And more
|
|
How do I set up SMS Email for the account?
Copy Link
By utilizing MxToolbox's SMS Email option as part of your account's notification policy, alerts are sent to your mobile device. Our system notifies you of any issues with your account, allowing you to quickly fix the problem.
To set up SMS Email for your MxToolbox account, simply follow the below steps:
- Log in to your account.
- Click “username@mxtoolbox.com” in top right corner for dropdown menu.
- Click “Settings” option directly below username.
- Click "Account Settings" tab to access your Account Management information.
- Find Account Users section (shown in below image).
- In the Set SMS Email field, enter your phone number and your mobile carrier's designated email address, separated by the @ symbol (e.g., 1234567890@txt.att.net).
- Click “Save” to confirm your SMS Email update.
- A green "Your settings have been saved" message will appear.
MxToolbox's SMS Email option supports the SMS Email addresses entered because we do not currently support native messaging. Please see the following highlighted image for more information about our SMS Email setup:

|
|
Does MxToolbox support 2FA?
Copy Link
Paid users can protect their accounts with additional security in the form of 2-Factor Authentication (2FA), also known as Multi-Factor Authentication (MFA).
MxToolbox supports SMS and Time-based One-time Password (TOTP).
Visit the MFA Settings Page to configure MFA. Note: You will be asked for your password a second time when accessing the MFA page to confirm that you are recently authenticated and should be able to enable or disable MFA on your account.
You can see the MFA status of other users on your account on the Account Management page.
|
|
What are the common SMS Email Address formats?
Copy Link
Your SMS address is the email address associated with your cell phone and is determined using your mobile phone number and mobile carrier.
For example, if your mobile phone number is 555-123-4567 and your carrier is AT&T, your SMS address would be 5551234567@txt.att.net. For non-US residents, the address must begin with your country code.
If you use one of the most popular carriers, here are some examples of what your "sender" email will appear as:
- AT&T: phonenumber@txt.att.net
- T-Mobile: phonenumber@tmomail.net
- Sprint: phonenumber@messaging.sprintpcs.com
- Verizon: phonenumber@vtext.com
- Virgin Mobile: phonenumber@vmobl.com
For comprehensive lists of SMS Email Address formats by carrier, see the following tables:
| Provider Name | Format |
|---|
| 3 River Wireless 10digitphonenumber@sms.3rivers.net |
| ACS Wireless 10digitphonenumber@paging.acswireless.com |
| Alltel 10digitphonenumber@message.alltel.com |
| AT&T 10digitphonenumber@txt.att.net |
| Bell Canada 10digitphonenumber@txt.bellmobility.ca |
| Bell Canada 10digitphonenumber@bellmobility.ca |
| Bell Mobility (Canada) 10digitphonenumber@txt.bell.ca |
| Bell Mobility 10digitphonenumber@txt.bellmobility.ca |
| Blue Sky Frog 10digitphonenumber@blueskyfrog.com |
| Bluegrass Cellular 10digitphonenumber@sms.bluecell.com |
| Boost Mobile 10digitphonenumber@myboostmobile.com |
| BPL Mobile 10digitphonenumber@bplmobile.com |
| Carolina West Wireless 10digit10digitnumber@cwwsms.com |
| Cellular One 10digitphonenumber@mobile.celloneusa.com |
| Cellular South 10digitphonenumber@csouth1.com |
| Centennial Wireless 10digitphonenumber@cwemail.com |
| CenturyTel 10digitphonenumber@messaging.centurytel.net |
| Cingular (Now AT&T) 10digitphonenumber@txt.att.net |
| Clearnet 10digitphonenumber@msg.clearnet.com |
| Comcast 10digitphonenumber@comcastpcs.textmsg.com |
| Corr Wireless Communications 10digitphonenumber@corrwireless.net |
| Helio 10digitphonenumber@messaging.sprintpcs.com |
| Houston Cellular 10digitphonenumber@text.houstoncellular.net |
| Idea Cellular 10digitphonenumber@ideacellular.net |
| Illinois Valley Cellular 10digitphonenumber@ivctext.com |
| Inland Cellular Telephone 10digitphonenumber@inlandlink.com |
| MCI 10digitphonenumber@pagemci.com |
| Metrocall 10digitpagernumber@page.metrocall.com |
| Metrocall 2-way 10digitpagernumber@my2way.com |
| Metro PCS 10digitphonenumber@mymetropcs.com |
| Microcell 10digitphonenumber@fido.ca |
| Midwest Wireless 10digitphonenumber@clearlydigital.com |
| Mobilecomm 10digitphonenumber@mobilecomm.net |
| MTS 10digitphonenumber@text.mtsmobility.com |
| Nextel 10digitphonenumber@messaging.nextel.com |
| OnlineBeep 10digitphonenumber@onlinebeep.net |
| PCS One 10digitphonenumber@pcsone.net |
| President’s Choice 10digitphonenumber@txt.bell.ca |
| Public Service Cellular 10digitphonenumber@sms.pscel.com |
| Qwest 10digitphonenumber@qwestmp.com |
| Rogers AT&T Wireless 10digitphonenumber@pcs.rogers.com |
| Rogers Canada 10digitphonenumber@pcs.rogers.com |
| Satellink 10digitpagernumber.pageme@satellink.net |
| Solo Mobile 10digitphonenumber@txt.bell.ca |
| Southwestern Bell 10digitphonenumber@email.swbw.com |
| Sprint 10digitphonenumber@messaging.sprintpcs.com |
| Suncom 10digitphonenumber@tms.suncom.com |
| Surewest Communications 10digitphonenumber@mobile.surewest.com |
| T-Mobile 10digitphonenumber@tmomail.net |
| Telus 10digitphonenumber@msg.telus.com |
| Tracfone 10digitphonenumber@txt.att.net |
| Triton 10digitphonenumber@tms.suncom.com |
| Unicel 10digitphonenumber@utext.com |
| US Cellular 10digitphonenumber@email.uscc.net |
| US West 10digitphonenumber@uswestdatamail.com |
| Verizon 10digitphonenumber@vtext.com |
| Virgin Mobile 10digitphonenumber@vmobl.com |
| Virgin Mobile Canada 10digitphonenumber@vmobile.ca |
| West Central Wireless 10digitphonenumber@sms.wcc.net |
| Western Wireless 10digitphonenumber@cellularonewest.com |
|
|
How do I use Inbox Placement with Third-Party Senders?
Copy Link
If you use a third-party provider, such as Mailchimp, Mailgun, or SendGrid, to send your outbound emails or marketing campaigns, you can still test your inbox placement pre-send with MxToolbox. Testing your inbox placement is beneficial for your email deliverability and shows you where your messages land: inbox, Spam/Junk, or failed to be delivered.
To set up inbox placement tests with senders like Mailchimp, Mailgun, and SendGrid, click here for more information.
|
|
Why am I listed on Spam RATS, but their website says my IP is not listed?
Copy Link
If you're seeing that you're listed on Spam RATS on our site, but you see that other sites, including the Spam RATS site itself show you as not listed that is due to the way Spam RATS handles certain IPs.
In cases of IPs that they are aware belong to providers (such as Google, Microsoft, etc) they may have a poor reputation. In that case, They ARE listed on Spam RATS and we will show them as listed, but do not show as listed on the Spam RATS website.
We have spoken with Spam RATS to let them know of possible confusion.
If you're having email delivery problems, you should speak with our representatives on what steps you can take for better email delivery by using the "Submit a Ticket" button on this page.
|
|
API Troubleshooting
Copy Link
If you're having a problem using the API, there are a few steps to check and some information to gather that will assist out support team in finding the problem.
- Please check your usage on our API Page to ensure you are within your API limits.
- Check rate limiting, if the error returned is 403 HTML response then this is likely due to rate limiting. The rate limit is variable so we can't give you a specific number. Please see our article on Rate Limits and using an exponential backoff.
- Check your lookup using the "Try It" button on the API Page.
- Collect the following information and contact our support team (There's a submit ticket at the top of this page):
- What IP(s) are the requests coming from?
- How are you making the calls (single machine, distributed network, an appliance, web/mobile app, etc)?
- How often are you looking to run lookups? Is this in short bursts, or throughout the day?
- What is the purpose of the API calls (ie we're trying to check the MX Record of all of our customers)?
- Have you already implemented an exponential backoff?
- Which specific API call(s) are you trying to make? Have these calls worked before? Have any other API calls worked for you before?
- Please provide the exact error you received as the timestamp. Please also include the full url you used for the API call and if you have code you can share with us, please include that as well.
|
|
How do I add other users to the account?
Copy Link
1. Click on your email address in the top right corner and click on Settings.
2. Click on Account Settings from the black navigation bar.

3. In the Invite User section, please:
- Enter the email address of the invitee.
- Select the permissions access level you want the new user to have. (For further details on the different permissions levels, click here: User Permission Types).

4. Click on Send Invitation.
The user will then receive an email invitation with the subject You're Invited to use MxToolbox! and will need to fill out their account settings and create a password.
|
|
Which IP Addresses should I whitelist for Notifications/Summary emails?
Copy Link
To ensure that you receive MxToolbox's Notifications and Summary emails, please whitelist the following two IPs:
- 143.55.235.77
- 159.112.248.76
|
|
What happens to Inbox Placement emails?
Copy Link
When you send an email to our Inbox Placement feature, the email is temporarily stored and deleted after 180 days. It is inaccessible on a secure server.
We are unable to immediately delete the email because current and future features will analyze it and produce related results/data.
|
|
Monitoring Customers: How do I add a billing contact to my account?
Copy Link
Monitoring Customers
Please follow the below steps to add yourself as a billing contact to your account. You will receive monthly or annual invoices from MxToolbox and billing reminders if/when payment issues occur. If you need to have another user on your account set to receive billing notifications, please contact Support by opening a ticket on this page.
- Log in to your MxToolbox account.
- Click your account name (email address) to access the drop-down menu and select the Billing option or simply paste the following link into your browser https://mxtoolbox.com/user/billing.aspx
- Select the Billing option.

- Check the box next to the Billing Reminders heading.

|
|
Delivery Center Customers: How do I add a billing contact to my account?
Copy Link
Delivery Center Customers
Notifications for Billing:
These settings control notifications sent out when events occur in billing and are for users who want to receive monthly or annual invoices from MxToolbox and billing reminders if/when payment issues happen.
Please follow the below steps to add a billing contact to your account. The added user will receive monthly or annual invoices from MxToolbox and billing reminders if/when payment issues occur:
- Log in to your MxToolbox account.
- Click the Notifications feature on the left navigation bar.

- On this page, you have access to Notifications by User, Notifications by Type, and Notifications History options. In this case, you will want to select Type.

- Find the Billing category tab and adjust which users are set to receive our Billing Reminders. If you do not see the user listed that you want to set Billing Reminders for, click the blue Invite New User button.

Note: At least one user on your account MUST keep the Billing Reminders notification enabled.
Also, for each section, the account holder (or any users given Editor permissions access) has the authority to bulk subscribe different users to none/all/some MxToolbox Notifications. Be sure to click the provided Help tab for more instructions and information regarding MxToolbox Notifications.

|
|
Can you help me get my DMARC records configured for Delivery Center?
Copy Link
Absolutely, please give us any details you can with your current problem. We are happy to help you with your DMARC records.
|
|
Inbox Placement: Hubspot won't let me send to the Inbox Placement addresses
Copy Link
If you are having trouble sending emails from Hubspot to our Inbox Placement addresses, you might need to modify the double opt-in status of those addresses in your Hubspot account. This double opt-in setting, if enabled, requires the email recipient address to have verified that they want to receive Hubspot messages. Our test address network is not able to perform that verification, so if you have double opt-in enabled, you will need to follow the process below to verify those addresses before Hubspot will allow you to send to our Inbox Placement addresses.
How to allow sending from Hubspot to our addresses:
You can update the double opt-in status for your contacts in bulk from your Contacts home. Using the process outlined below will NOT trigger the opt-in email send, but rather will mark the contacts as having confirmed double opt-in.
- In your HubSpot account, from the top left of the navigation menu, select Contacts > Contacts.
- You should now see a list of your contacts. Using the search field, search for the Inbox Placement test addresses. They all begin with inbox-placement@ and can also be found in Step 1.
- After finding those addresses, click the checkboxes next to them.
- At the top of the table, click the More dropdown menu and select Update double opt-in status.
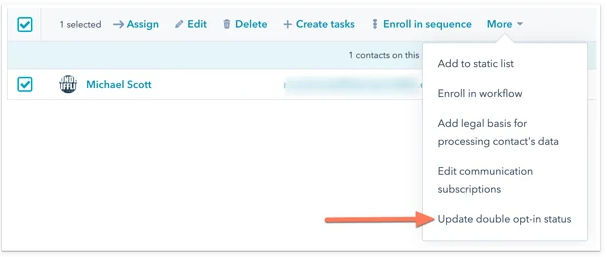
- In the dialog box, select the Confirm double opt-in for selected contacts radio button, then click Save.
With those changes implemented, you should now be able to send emails to our Inbox Placement tool. If you need any more information, see the below explanation from this HubSpot article.
About Hubspot Double Opt-in
- When double opt-in is enabled, contacts who have NOT confirmed opt-in will be dropped from any marketing emails, unless your account has data privacy settings turned on and the email includes a subscription confirmation link. This includes new contacts who filled out a form and do NOT click the confirmation link in the double opt-in email, as well as existing contacts who have never received a HubSpot marketing email.
- Contacts who were sent marketing emails from your HubSpot account before double opt-in was enabled will be considered confirmed and remain eligible to receive emails from you.
- Contacts created from an email sent with the HubSpot Sales Chrome extension or HubSpot Sales Outlook add-in will need to confirm their subscription before being included on marketing emails. These contacts will remain eligible for sales emails sent from the contact record.
- Once you have the double opt-in feature enabled, you can manually send an opt-in email to an unconfirmed contact from their contact record. Above the contact name in their contact record, click the Actions dropdown menu, then select Send opt-in email. If the contact has already confirmed their subscription, this opt-in email will NOT be sent.
|
|
Monitoring Customers: How do I invite a new billing contact to my account?
Copy Link
Monitoring Customers
Please follow the below steps to invite a new billing contact to your account. They will receive monthly or annual invoices from MxToolbox and billing reminders if/when payment issues occur. If you have any billing contact questions, please contact Support by opening a ticket on this page.
- Log in to your MxToolbox account.
- Click “username@mxtoolbx.com” in the top right corner to access the drop-down menu or use the following URL:https://mxtoolbox.com/user/account

- Click the “Settings” option directly below the username.
- Click the “Account Settings” tab on the black navigation bar.

- In the Invite User section, enter the email address you want to receive paperless billing invoices.
- Select the “Billing Only” access level.
- Click the orange “Send Invitation” button.

- Your changes have now been saved and billing notices will be sent to the corresponding email address.
|
|
Do I need to complete Sender Authentication if I use SendGrid?
Copy Link
Unfortunately, SendGrid is now instructing its customers to add a DMARC TXT Record "v=DMARC1; p=none" when configuring Sender Authentication. SendGrid's page provided to customers from 3rd-Party Vendors is NOT allowing the verification to happen and the vendor needs to verify that MxToolbox's DMARC CNAME setup is correct.
If you use SendGrid and encounter a step to create a DMARC TXT Record during Sender Authentication, MxToolbox offers the following DMARC Integration option:
- DMARC Integration for Delivery Center:

If you are already set up for DMARC with us, your vendor simply needs to verify the Sender Authentication without the replacement or modification of the DMARC Record currently set up. Then, you are good to go.
If you are NOT already set up for DMARC with us, use the above DMARC Integration for improved email delivery. After the integration is complete, your vendor needs to verify the Sender Authentication without the replacement or modification of the DMARC Record currently set up.
For DMARC setup assistance, please contact our expert Support Team.
|
|
How do I set up Notifications in Delivery Center?
Copy Link
MxToolbox's Notifications system keeps you updated on various aspects of your Delivery Center experience. To avoid missing a status or account alert, this feature lets you choose which notifications you want to receive to stay in the know.
Your current settings, subscribed users, and history of all notifications sent regarding your MxToolbox account are all consolidated in a single dashboard view. You can manage Notifications by User or by Type and view Notifications History for the entire account. You can quickly turn on/off different email notifications and monitor who receives them.
With our Notifications system, you can:
- Set up specific notifications for individual members of your tech team based on their specialties.
- Limit billing notifications to your billing contacts.
- Remove unnecessary notifications, alerts, or reports from disinterested users.
Using MxToolbox Notifications
To begin selecting which notifications you would like to receive in your inbox, simply click the "Notifications" header toward the bottom of your Delivery Center interface:

At the top of this page, there are three Notifications categories:

Each category is editable and allows you to participate in different aspects of MxToolbox Notifications.
Notifications by User
The Notifications by User option lets you choose which parts of the MxToolbox experience you want selected users/team members to receive scheduled alerts for. You can use the none option to decline alerts by category, or you can select the all button if you prefer to receive every available notification via email.

The Delivery Center, Account, Summaries, and Other sections are also editable, so you can pick and choose specific notifications that users will receive alerts for in the future. Be sure to click on the helpful info and link icons (shown below) in each category for more insight.

Note: Some notifications cannot be disabled because they are required for supporting your account.
Notifications by Type
This Notifications section organizes them by type. You can easily set up multiple team members to receive specific emails or view who is currently allowed to receive them. Plus, you can quickly subscribe/unsubscribe certain teammates to various alerts.
On the left side of the interface, each tab (Delivery Center, Account, Summaries, and Other) lists the corresponding categories of those four headers.
For example, the Summaries category shows the Delivery Center and Monitoring types. Under each, their specific notifications are shown.
 Assigned Users
On the right side of the page, the Assigned Users for every notification are provided. If you want to see or change who receives the various types of notification, simply select a specific alert and update the user's access by clicking their corresponding button in the Assigned Users section. Green means that teammate will receive any notifications assigned to them.
Notifications History
The Notifications History page provides a log of all notifications sent to your chosen users, as well as any setting changes that affect notifications. For example, if you want to confirm that an MxToolbox Blacklist Summary report or a Monitoring Alert email was sent to a team member selected to receive those notifications, this interface provides that information. All updates and changes made are conveniently shown here.
Using the shown drop-down menus (Type, Domain, By, For, and Result), you can adjust the data view. These options essentially work as filters.

The table lists different characteristics of every notification for review, including: Date, Topic, Type, Domain, By, For, and Result. They are sortable to give you the desired insight.
If you need help setting up any MxToolbox Notifications, our expert Support Team is ready to get you and your colleagues situated. The corresponding "Help" tab for each category is also a great reference to utilize. Stay informed and start receiving important MxToolbox alerts and communications in your inboxes today!
|
|
What is the difference between Bulk vs. Transactional Email (Google/Yahoo)?
Copy Link
What Is Bulk Email?
Bulk email, often referred to as marketing or promotional email, is defined as a message sent to a large number of recipients at one time. There are various kinds of bulk email, such as:
- Newsletters
- Sales/discounts campaigns
- Promotional offers
- Marketing campaigns
What Is a Bulk Sender?
If you send a single email to roughly 5,000 contacts in a single day, you fall under the bulk sender umbrella. Google set its threshold at 5,000 emails, but Yahoo! has a more liberal interpretation/cutoff.
Basically, if you’re sending a single email to many recipients, you’re considered a bulk sender. It’s important to use email best practices when sending messages because once you’re labeled a bulk sender, you’re always a bulk sender. This will mean you will forever be subject to bulk sender rules.
Per Google: "A bulk sender is any email sender that sends close to 5,000 messages or more to personal Gmail accounts within a 24-hour period. Messages sent from the same primary domain count toward the 5,000 limit.
Sending domains: When Google calculates the 5,000-message limit, [we] they count all messages sent from the same primary domain. For example, every day you send 2,500 messages from yourdomain.com and 2,500 messages from promotions.yourdomain.com to personal Gmail accounts. You’re considered a bulk sender because all 5,000 messages were sent from the same primary domain: yourdomain.com."1
Again, any sender who reaches that threshold at least once is permanently considered a bulk sender moving forward.
Per Yahoo: "In order to better enforce anti-spam policies, Yahoo does not disclose the number of recipients or emails that can be sent at one time.
If you've received a notification that a limit has been met, you'll need to wait a set amount of time before you can send more emails. Most sending limit notifications inform you of how long you'll have to wait.
If you're planning to regularly send bulk email, consider looking into alternate solutions, like a third-party bulk email option."2
Please note that most ESP's provide both a bulk sending and a transactional sending capability.
What Is a Transactional Email?
Transactional emails are messages sent in response to an action a user/customer takes on a specific site, app, or interface. These emails contain content specific to that user and are typically sent as stand-alone messages. They are referred to as Transactional due to the fact that they are considered necessary to provide a functional account/service to the user and part of the daily transactions that occur in that account. Common examples include:
- Password reset emails
- Payment invoices
- Account creation/activation emails
- Shipping confirmations
- Welcome emails
- Purchase receipts
- Alert notifications
- Product & Software updates
- Order confirmation emails
- Reservation confirmations
Transactional emails are a common and accepted practice. Recipients typically expect to receive them when completing certain online actions as part of a confirmation process or as part of the functioning of the service.
FAQs
Q: Are billing/payment invoices transactional?
A: Yes, invoices are considered to be in the transactional email category.
Q: What about reminders or other notifications that come from my system?
A: Yes, any reminders or notifications from your system are transactional email.
Q: Ads in transactional emails? What if I have a banner ad for something included in my invoices?
A: Transactional emails should NOT contain any bulk/marketing content in order to comply with commercial email laws, such as the CAN-SPAM Act. It’s always recommended to separate bulk emails from transactional emails.
Q: Do all messages require one-click unsubscribe?
A: Per Google: "No. One-click unsubscribe is required only for marketing (bulk) and promotional messages. Transactional messages are excluded from this requirement (e.g., password reset messages, reservation confirmations, and form submission confirmations).
Senders that already include an unsubscribe link in their messages have until June 1, 2024 to implement one-click unsubscribe in all bulk emails."3
1 https://support.google.com/a/answer/14229414?hl=en#zippy=%2Cwhat-is-a-bulk-sender
2 https://help.yahoo.com/kb/SLN3353.html
3 https://support.google.com/a/answer/14229414?sjid=13238872189965188635-NC#zippy=%2Cdo-all-messages-require-one-click-unsubscribe
|